
2. Foundation (Copy)

Let’s start with THE question.
A. What’s the number one reason images fail?
Click here for the answer

So - the easiest and fastest way to instantly improve our images is simply to declutter them.
As we learned in the previous lesson: our eyes like to bounce around an image looking at everything (even the things that are unimportant). Therefore, whatever we put in the frame should be worthy of our attention - otherwise it’s a distraction that draws attention away from what’s really meaningful.
Effect of Decluttering - Example.
Below is a photo of a girl hiding under a bed. There are distracting elements in the frame, namely a laptop bag and toys that don’t belong to the child, and therefore have no significance to her. Let me use Photoshop to travel back in time and remove the clutter.
Slide right to see both versions, thinking about which image your eye prefers?


When the toys and bag are eliminated from the image, our attention goes straight to the girl hiding under the bed and more importantly, stays there. Isn’t it amazing what a big difference this small change makes?
Rather than relying on Photoshop to clean up an image it’s always much easier to just pay attention to what’s included within the four walls of the photo frame.
Hence, our new mantra (with repetition for good effect)
Put in the frame only what’s important.
Everything in the frame should have a purpose.
Leave out any unnecessary distractions.
2. Case-Study
Photographer: Busy parent
Subject: 6 month old daughter
Moment: First time daughter investigates what treasures might lie within the recycling baskets. Aka: child-proofing of whole apartment now required!
Photo: Take a moment to look at the photo and observe how your eyes read the image. Where do they go first, and what else do they look at?

The result: We look at the toddler reaching into the basket (people always attract us first) but a split second later, our eyes bounce around the rest of the scene trying to make sense of the other objects. Did this also happen to you?
The poignancy of the moment is lost in the clutter!*
*And it’s not the apartment that’s cluttered -
it’s the photo that’s cluttered.
Here’s how my eyes read the image:
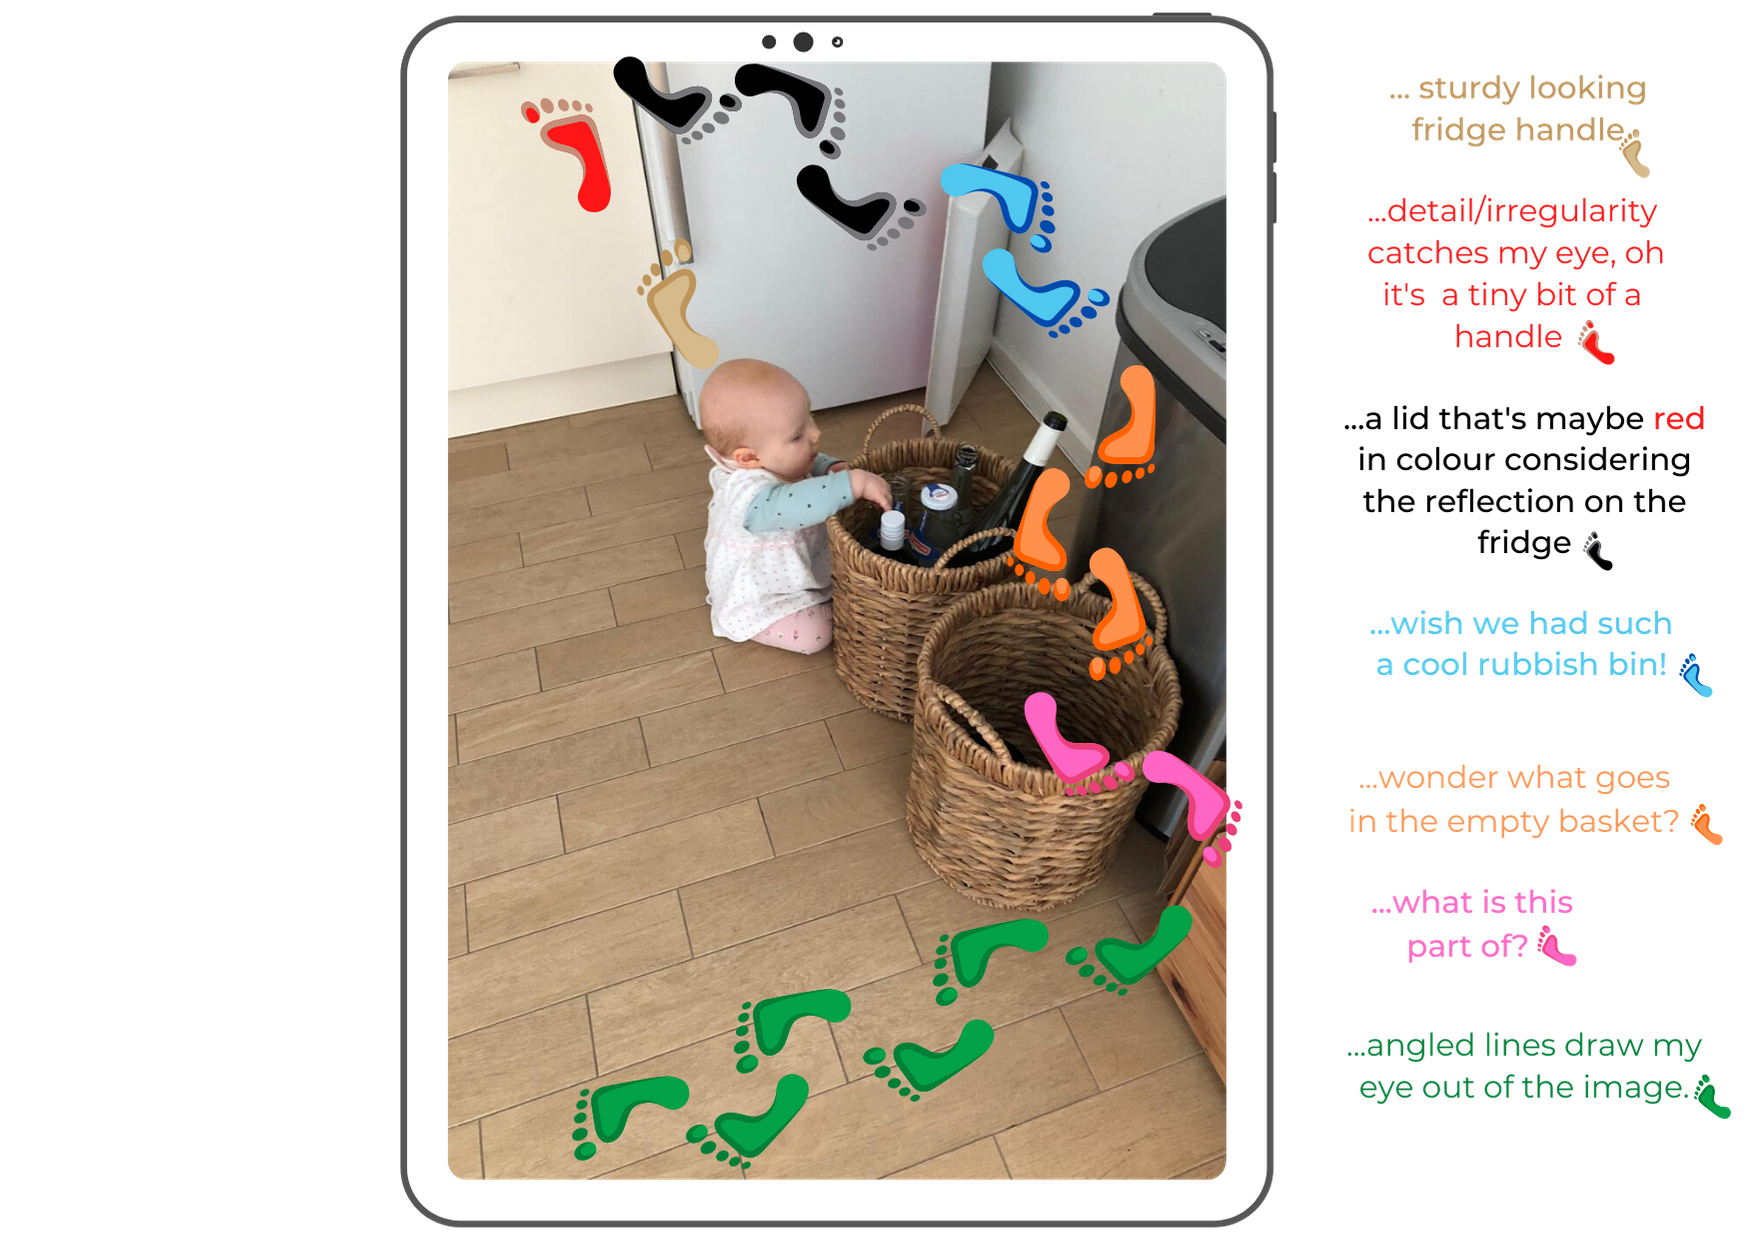
The image represents a significant developmental leap and is a beautiful moment to photograph. We can infer that the mum saw the moment, whipped out her phone, and took the photo - as speed was no doubt of the essence. We can also guess, as we learned in lesson one, that the mum’s eyes had filtered out the rest of the scene - and just zoomed in on what was important; her daughter and the baskets.
Here is the same photo cropped to remove any distractions. It’s now more reflective of what was actually important in the moment: the girl, for the first time, able to balance herself and peer into the baskets, and it becomes a stronger photo to look back on in years to come.

But how to declutter photos you might wonder? Because we aren’t painters starting with an empty canvas. Plus, life is busy and time is short.
3. the easiest way to declutter a scene is. . .
Click here for the answer
Simply changing our physical position to change what’s included in the frame!

Often, the difference between a snapshot and a stronger image is as simple as taking one step, to change our position and perspective and most importantly, alter what’s in the background.
In the words of one of the greats:
“A good photograph is knowing where to stand”
“WAIT”!
You might be saying.
“I’m taking a course to improve my photography, only to be told that the secret is to move my feet”?
And yes - that’s kind of accurate, but also, it’s the best part!
The brilliance is in the simplicity. Plus, we always have the tools with us! In the blink of an eye we can:
take a step closer - and raise the camera, or
move further back and crouch down, or
step to the right and move in…
Not taking a few seconds to recompose reminds me of that famous quote from Mark Twain:

4. In the field
Some people might think photographers rely on different lenses to clean up a scene, but it’s not the case. We mostly use our feet to drastically change compositions, working creatively to make an image with what’s in front of us.

With every photo I’m constantly thinking about what’s in the background - and how I can change the camera angle to eliminate this or that.
What’s great, is that once you’re comfortable with this, it only takes a few seconds. The heavy-lifting so to speak, is in learning and internalising the strategies, so they become second nature.
(The next lesson is dedicated solely to an activity to practice this).
Examples
All the images in the gallery below are taken with exactly the same lens. It’s a 35mm prime lens (one length/no zoom).
Observe the diversity of images possible just by changing one’s position relative to the subject.
The ten images in the gallery below are ordered according to how far away the camera was from the subject; furthest to closest.


One thing to keep in mind. . .
5. POINT OF VIEW
We all have a natural tendency to take photos from the usual place we see the world; our eye level. And this makes sense. If a moment looks good where we’re standing, why not capture it from that same place?

When we start to change our body and camera position to remove distracting elements, we can not only improve the photo but can also alter the viewers perspective of the scene.
This concept isn’t something I have in the forefront of my mind when I’m shooting, but it is worth mentioning, nonetheless. When you change your position, you’ll also have an impact on how the photo feels; whether it shows the moment more from the perspective of an outsider, or from that of the subject.
**The last example in the list below, ‘getting down low’, is my go-to-strategy for anytime I’m struggling to find a composition I like. Keep it in mind as well - as it’s often super helpful.

OUTSIDE LOOKING IN
Taking a step back and showing the scene through a doorway emphasises the intimacy of the moment, and also great to highlight mischievous behaviour.

BIRDS EYE VIEW
Taking the photo from above, highlights what the subjects see.

INCLUDING THE POINT OF VIEW OF THE PERSON WITH THE SUBJECT
This shows the point of view of the dad, but also includes his hand to document him being there.

SHOWING THE ENVIRONMENT
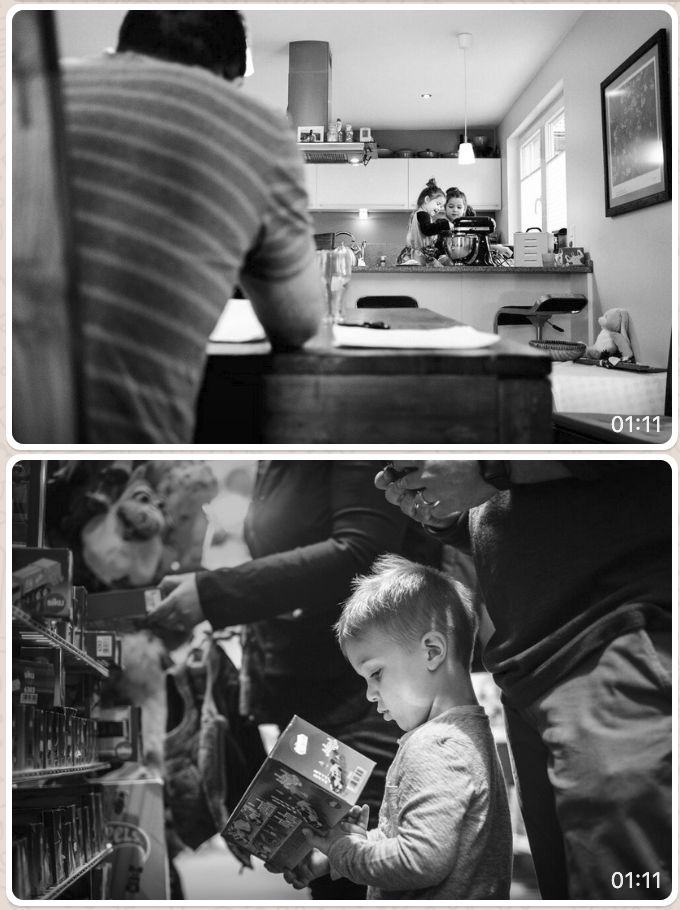
Here the Dad is catching up on some work while his girls are baking. Taking a step back to take this photo lets us capture the dining room and kitchen as well as the subjects.

CAPTURING DETAILS
Getting close up and showing details emphasises the feeling of being there.

EYE LEVEL OF YOUR CHILD
By shooting from a lower angle, you can more closely capture your child’s perspective.
STUDENT QUESTION:
I received an excellent question about this lesson - so I wanted to share the answer here - as it raises a great point.
"These two images (shown below) are cluttered, but they still look good. Is it because they are black and white"?
A completely empty background can work great at times and is the focus of Lesson 4!
However decluttering an image doesn’t mean the background has to be completely empty. Decluttering a photo simply means that everything in the frame should have a purpose for being there. E.g, We want to avoid a stray chair leg, random sock, or edge of a table etc.
Re the boy in the toy store:
Notice how the subject is surrounded by his parents and the toys. This is what is most important to the image. Everything else in the shop is cropped out by moving the camera to get down low and get in close to take the photo.
If the parents’ faces were included - by stepping back to show more of the scene - there would have been too much extra information (clutter). I.e., we would also see the ceiling of the shop, more of the window in the background, toys on the other side of the aisle... It would have created too many distractions - and wouldn’t have been easy to rest our eyes on the subject. In this instance, even though the image still has lots of information in the frame (3 subjects and the toys), much more has been left out.
*We also come back to this image in Lesson 9 and you’ll see exactly how I tried to avoid the ‘clutter’ i.e., avoid any unimportant details.
Re the girls in the kitchen
This image shows more of the home environment - so by default will include more details and ‘stuff’. But notice how the left of the image is basically just the dad. This cleans up and ‘declutters’ part of the image we don’t need. We avoid any distractions on the table. Dad’s head kind of blocks the brightest light. And the image on the right starts at an artwork on the wall so also feels clean (the door and an extra chair is cropped out).
NB: Both images also use some extra compositional techniques we’ll learn in the next lessons to also help direct focus and make them stronger.
Re colour vs BW
Both images were converted to BW because of the light situation. When there are mixed lights (natural light + artificial light in the same scene) it can sometimes make skin tones look unnatural. You can see the colour version in the slider below. To me the skin looked a little grey and washed out, and my eye kept going to the pocket area of the pants on the right and orange on the box on the left (as they’re bright in the frame) - however, there’s definitely an element of personal preference involved.


The art of photography is all about directing the attention of the viewer.
STEVEN PINKER

Our first practice activity is next!
Estimated time required: 15mins.